![]()
Video translation and subtitling is one of the most time-consuming tasks for editors and content creators.
Editing the footage is already a lot of work… but writing subtitles manually and syncing them perfectly with the audio? That’s a real nightmare that can take hours — sometimes days.
Many online tools promise to solve this, but most are slow, expensive, or force you to upload your files to the cloud.
Today, I want to introduce you to AutoSubs — a powerful open-source tool that runs locally on your computer and eliminates this pain with literally one click.
What is AutoSubs?
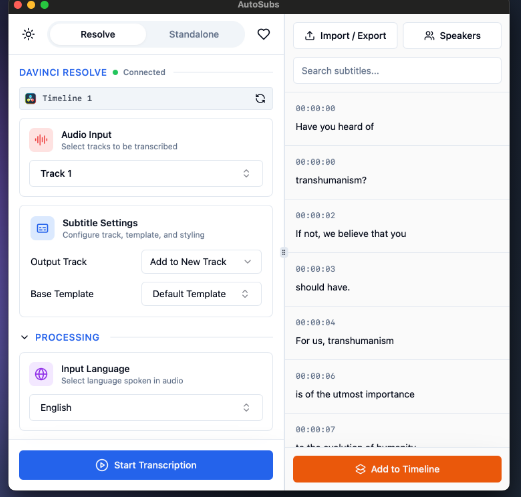
AutoSubs is a smart AI tool that converts any video or audio file into accurate, timed subtitles, with automatic speaker identification and perfect synchronization.
It works entirely locally on your machine (no cloud upload), and you can use it as a standalone app or directly inside DaVinci Resolve.
The result? Professional-looking subtitles ready in minutes instead of hours.
Key Features
- High-accuracy automatic transcription using powerful AI models (Whisper, Parakeet, Moonshine)
- Speaker diarization — each speaker gets a different color
- Translation to English (with plans to add more languages)
- Full customization of subtitle style (colors, borders, effects)
- Seamless integration with DaVinci Resolve — send subtitles directly to the timeline
- Advanced built-in editor for fine-tuning timing and text
- Supports transcription in over 50 languages
- Works on Windows, macOS (Apple Silicon + Intel), and Linux
And best of all: it’s completely free and open source.
Who Is AutoSubs For?
- Video editors who use DaVinci Resolve (even the free version)
- YouTube and TikTok content creators
- Anyone producing multilingual content
- Anyone tired of spending long hours manually writing and syncing subtitles
Installation (Very Easy)
For Regular Users (Windows / macOS):
- Go to the official GitHub releases page
Auto-Subs v3.0.8 - Download the installer for your system (.exe for Windows or .pkg for macOS)
- Run the installer and follow the simple steps — done!
For Linux:
Use the .deb package available in the Releases.
Official Download & Website:
https://tom-moroney.com/auto-subs
GitHub Repository:
https://github.com/tmoroney/auto-subs
How to Use It
Standalone Mode:
- Open AutoSubs
- Select your video or audio file
- Choose the language and model
- Click Transcribe
- Make any necessary edits, then export as SRT or send directly
Inside DaVinci Resolve:
- Open Resolve → Workspace → Scripts → AutoSubs
- Select your timeline
- Click Transcribe
- Edit if needed, then send the subtitles directly to the timeline with your custom style
Conclusion
If you’re still writing subtitles manually or using slow and expensive tools — AutoSubs completely changes the game.
It runs locally, it’s fast, accurate, and integrates beautifully with DaVinci Resolve. Whether you’re a professional editor or a content creator, it will save you hours every single week.
Try it now — it’s completely free and requires no subscription.
Useful Links:
- GitHub: auto-subs